인턴 일기 [02화]
jo._.on_
·
2025. 2. 28.

"인턴 일기 [01화]에서 이어집니다..."
LangGraph와 지식그래프
안녕하세요, jo._.on_ 의 돌아온 인턴 일기 입니다. 😆😆 오늘은 LangGraph와 지식 그래프(Knowledge Graph)의 주요 개념에 대해 소개해 드리고자 합니다. 그리고 LangGraph와 Neo4j를 결합한 GraphRAG 시스템의 end-to-end 구조도 간단한 코드 예제를 통해 공유할 예정입니다. 그럼 바로 시작해보죠!!
1️⃣ RAG(Retrieval-Augmented Generation)의 개념
RAG는 대규모 언어 모델의 활용 기법 중 하나로, Fine-Tuning과 함께 큰 주목을 받은 기술 중 하나입니다. LLM은 사전에 방대한 양의 데이터를 학습하지만, Fine-tuning을 거치더라도 기존 지식의 한계와 Hallucination 문제를 온전히 극복하지 못한다는 문제가 있죠.
이러한 한계를 극복하기 위해 등장한 RAG는 언어 모델에 '검색(Retrieval)' 기능을 결합하여 사용자의 입력(쿼리)과 관련된 정보를 DB에서 검색한 후, 이를 기반으로 답변을 생성합니다. 이 방식은 실시간 정보 검색을 통해 더 정확한 답변을 제공하며, Fine-Tuning의 단점을 효율적으로 보완합니다. 하지만 일반적인 RAG 방식 혹은 Retrieval 기능은 여전히 몇 가지 한계가 있습니다.
'문맥(Context)의 제한' :
대부분의 RAG 시스템은 검색된 문서를 단순히 프롬프트에 추가하는 방식으로 작동하지만, LLM의 컨텍스트 창은 제한되어 있어 복잡한 질문에 대해 충분한 정보를 제공하지 못할 수 있습니다.'의미적(Semantic) 연결 부족' :
벡터 기반 검색은 단순 키워드 유사성에 의존하기 때문에, 문서 간의 논리적 관계나 개념적 연결을 파악하는 데 한계가 있습니다.'구조화된(Structured) 데이터 처리의 어려움' :
기존 RAG는 텍스트 중심으로 설계되어 있어 숫자 데이터, 날짜, 관계형 정보와 같은 구조화된 데이터를 효과적으로 처리하기 어렵습니다.'다단계(Multi-process) 추론 부족' :
복잡한 질문에 답하기 위해 여러 단계의 추론이 필요한 경우, 단순 검색 기반 접근은 충분하지 않습니다.
결국 RAG 또한 이러한 한계로 인해 실제 비즈니스 환경에서는 검색 과정에서 관련 자료를 효과적으로 가져오지 못하거나, 사용자 입력에 대한 불완전한 응답을 제공하는 등의 문제가 발생합니다. 그 중에서도 문맥의 온전한 반영이 어렵고, 의미적 연결성이 부족하다는 문제는 다음 소개할 GraphRAG의 주요 등장 배경이 됩니다.
Graph + RAG의 등장 배경
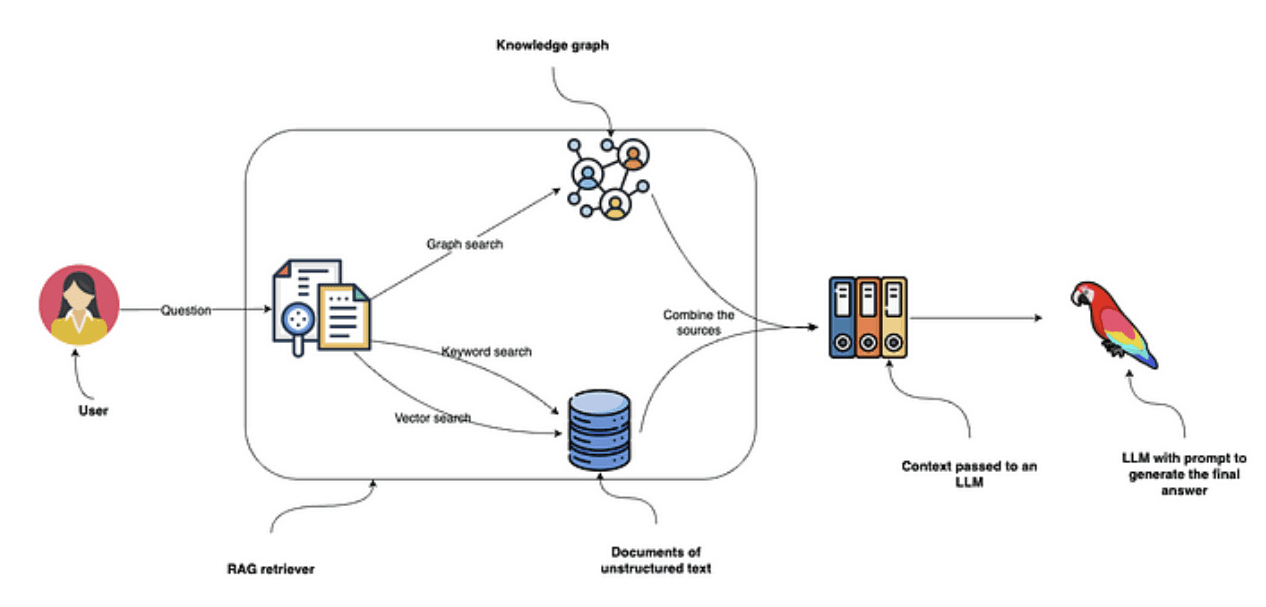
일반적인 RAG 시스템은 텍스트 형태의 데이터를 chunk 단위로 분류하고, 이를 다시 벡터 임베딩 형태로 변환하여 vectorDB에 저장합니다. 그리고 필요할 때마다 (== Retrieve 요청 시) 유사성 검색을 통해 LLM에 컨텍스트를 제공합니다. 하지만 실제 비즈니스 환경에서는 텍스트와 같은 비정형 텍스트 외에도 구조화된 속성 요소들이 다수 존재합니다.

이로 인해 AI 시스템의 복잡한 chain 구조에서 단순 벡터 기반의 쿼리는 그 정확성과 효율성이 저하될 수 있는 문제가 발생합니다. 이러한 논의들이 지속되면서 기존 벡터 기반 RAG의 한계를 보완하기 위해 지식그래프 기반의 GraphRAG가 등장했습니다.
https://blog.langchain.dev/enhancing-rag-based-applications-accuracy-by-constructing-and-leveraging-knowledge-graphs/
Neo4j의 역할

지식그래프를 구축하여 지식을 검색하는 GraphRAG는 구조화된 데이터 엔티티 간의 관계를 효율적으로 관리하고 활용할 수 있습니다. 특히 Neo4j는 이러한 그래프 구조를 표현하고 저장하는데 매우 효과적이죠 😀😀
Neo4j의 주요 특징:
대규모 그래프 분석 및 데이터 시각화를 지원하는 확장성이 뛰어난 그래프 데이터베이스
Cypher 쿼리 언어, 내장된 시각화 도구 및 커뮤니티 지원
이 Neo4j 의 강력함은 뒤에서 코드를 통해 조금 더 자세히 다뤄보도록 하겠습니다.
LangGraph의 개념
LangChain이 LLM 통합과 기본적인 체인 구성에 중점을 두었다면, LangGraph는 더 복잡한 내부 워크플로우와 정교한 의사결정 프로세스를 지원합니다.
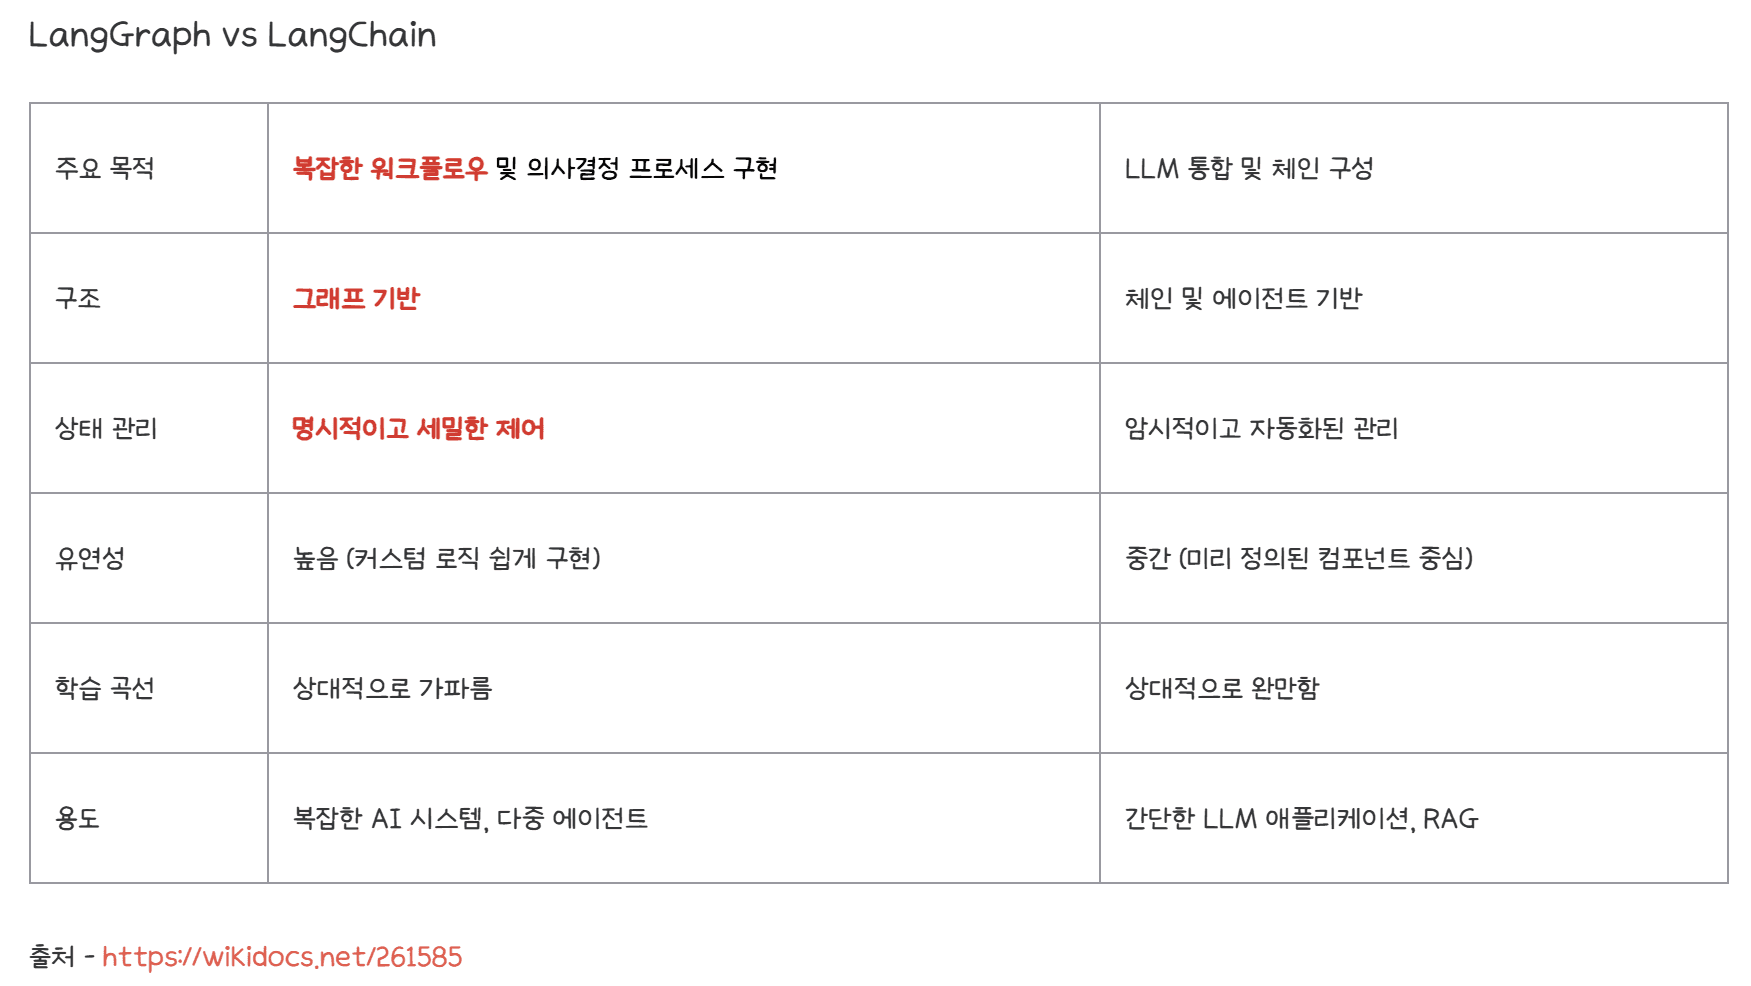
LangGraph의 주요 특징을 LangChain과의 비교를 통해서 간단하게 소개했는데요. 크게 다음 3가지 특징이 있습니다.
그래프 구조의 워크플로우
명시적인 상태 관리
다중 에이전트 시스템

이제 GraphRAG, Neo4j, LangGraph에 대한 기본적인 형태와 특징을 이해했다면, 해당 도구들로 간단한 파이프라인을 구축해보도록 하죠!!
2️⃣ GraphRAG + LangGraph + Neo4j 구현
구현에 앞서 먼저 해당 코드가 어떤 구조와 특징을 띄고 있는지 설명드리겠습니다.😴😴 이 코드는 Python을 통해 구현한 공급망 관리(Supply Chain Management) 시스템의 일부입니다. 먼저 Neo4j 를 통해 그래프 데이터베이스를 구축하고, 이를 대형 언어 모델(LLM - OpenAI API)과 연결하여 자연어로 데이터를 쿼리할 수 있는 간단한 시스템이죠. 구체적으로는:
Neo4j 그래프 데이터베이스 구축:
공급자(Supplier), 제조업체(Manufacturer), 유통업체(Distributor), 소매업체(Retailer), 제품(Product) 등의 노드 & 이들 간의 관계(supplies, manufactures, offers 등)를 CSV 파일에서 로드하여 그래프 데이터베이스에 저장
OpenAI의 임베딩 모델 통합:
텍스트 설명에 대한 벡터 임베딩을 생성하여 Neo4j에 저장 & 이를 통해 의미론적 유사성 기반의 검색 가능
LangChain 프레임워크를 활용한 도구(Tool) 생성:
supplier-count: 특정 조건(공급량 범위 등)에 맞는 공급업체 수를 계산하는 도구supplier-list: 조건에 맞는 공급업체 목록을 추출하는 도구이 도구들은 자연어 쿼리를 Cypher 쿼리로 변환하는 역할
아래 코드는 링크를 참고하여 작성했습니다. (실습 중 데이터가 필요하다면 해당 링크를 참고하세요!!)
https://medium.com/globant/langgraph-ai-agents-with-neo4j-knowledge-graph-7e688888f547
먼저 각종 라이브러리를 설치하여 초기 설정을 마칩니다.
# ===========================
# 라이브러리 설치 및 Neo4j 초기 설정
# ===========================

# !pip install langchain
# !pip install langchain_openai
# !pip install neo4j
# !pip install pyvis

# Neo4j 인스턴스 생성 및 연결 설정

from langchain_community.graphs import Neo4jGraph

graph = Neo4jGraph(url = "bolt://...", username = "neo4j", password = "...", refresh_schema = False)
이후 Neo4j 인스턴스를 생성했다면, 링크에서 제공하는 데이터를 Neo4j 인스턴스에 적재할 수 있는 노드 생성 함수와 엣지 생성 함수, 인덱스 생성 함수를 정의해보겠습니다.
nodes.csv
relationships.csv
# ===========================
# 데이터 적재(Ingestion) 준비
# ===========================

import csv
import numpy as np
from neo4j import GraphDatabase

# 노드 정보가 담긴 CSV 파일 경로 설정 (소매업자, 제품, 공급자, 유통업자, 제조업자)
NODES_CSV = "C:/LangGraph_Tutorial/.../nodes.csv"

# 엣지(관계) 정보가 담긴 CSV 파일 경로 설정 (공급, 제조, 제안 관계)
RELATIONSHIPS_CSV = "C:/LangGraph_Tutorial/.../relationships.csv"

# 노드 타입에 따른 레이블 매핑 함수
def get_label_for_type(node_type):
    """
    노드 타입에 따라 적절한 Neo4j 레이블을 반환합니다.

    Args:
        node_type: 노드의 타입 문자열

    Returns:
        해당 타입에 맞는 Neo4j 레이블, 매핑이 없을 경우 'Entity' 반환
    """
    mapping = {
        "Supplier": "Supplier", # 공급자
        "Manufacturer" : "Manufacturer", # 생산자
        "Distributor" : "Distributor", # 유통업자
        "Retailer" : "Retailer", # 소매업자
        "Product" : "Product" # 제품
    }

    return mapping.get(node_type, "Entity")
# ===========================
# 노드 데이터 적재 함수
# ===========================

def ingest_nodes(driver):
    """
    CSV 파일에서 노드 정보를 읽어 Neo4j 데이터베이스에 적재합니다.

    Args:
        driver: Neo4j 드라이버 객체
    """
    with driver.session() as session:
        with open(NODES_CSV, mode = 'r', encoding = "utf-8") as f:
            reader = csv.DictReader(f)

            for row in reader:
                # CSV에서 노드 속성 추출
                node_id = row['id:ID']
                name = row['name']
                node_type = row['type']
                location = row['location']
                supply_capacity = np.random.randint(1000, 50001)  # 공급 용량 랜덤 생성
                description = row['description']
                label = get_label_for_type(node_type)  # 노드 타입에 맞는 레이블 가져오기

                if location.strip():
                    # 위치 정보가 있는 경우 모든 속성 포함하여 노드 생성
                    query = f"""
                    MERGE (n:{label} {{id:$id}})
                    SET n.name = $name, n.location = $location,
                        n.description = $description, n.supply_capacity = $supply_capacity
                    """
                    params = {
                        "id": node_id,
                        "name" : name,
                        "location" : location,
                        "description" : description,
                        "supply_capacity" : supply_capacity
                    }

                else :
                    # 위치 정보가 없는 경우 기본 속성만 포함하여 노드 생성
                    query = f"""
                    MERGE (n:{label} {{id:$id}})
                    SET n.name = $name
                    """
                    params = {"id": node_id, "name": name}
                session.run(query, params)  # Cypher 쿼리 실행
# ===========================
# 관계(엣지) 데이터 적재 함수
# ===========================

def ingest_relationships(driver):
    """
    CSV 파일에서 관계(엣지) 정보를 읽어 Neo4j 데이터베이스에 적재합니다.
    => 이 때 Neo4j 가 지원하는 Cypher 언어를 사용합니다.

    Args:
        driver: Neo4j 드라이버 객체
    """
    with driver.session() as session:
        with open(RELATIONSHIPS_CSV, mode='r', encoding='utf-8') as f:
            reader = csv.DictReader(f)
            for row in reader:
                # CSV에서 관계 속성 추출
                start_id = row[':START_ID']  # 시작 노드 ID
                end_id = row[':END_ID']  # 종료 노드 ID
                rel_type = row[':TYPE']  # 관계 타입
                product = row['product']  # 관련 제품 정보

                if product.strip():
                    # 제품 정보가 있는 경우 속성에 포함하여 관계 생성
                    query = f"""
                    MATCH (start {{id:$start_id}})
                    MATCH (end {{id:$end_id}})
                    MERGE (start)-[r:{rel_type} {{product:$product}}]->(end)
                    """
                    params = {
                        "start_id": start_id,
                        "end_id": end_id,
                        "product": product
                    }
                else:
                    # 제품 정보가 없는 경우 기본 관계만 생성
                    query = f"""
                    MATCH (start {{id:$start_id}})
                    MATCH (end {{id:$end_id}})
                    MERGE (start)-[r:{rel_type}]->(end)
                    """
                    params = {
                        "start_id": start_id,
                        "end_id": end_id
                    }
                session.run(query, params)  # Cypher 쿼리 실행
# ===========================
# 인덱스 생성 함수
# ===========================

def create_indexes(driver):
    """
    노드 ID에 대한 유일성 제약조건(Unique Constraint)을 생성하여 검색 성능을 향상시킵니다.

    Args:
        driver: Neo4j 드라이버 객체
    """
    with driver.session() as session:
        # 각 노드 타입별로 ID에 대한 유일성 제약조건 생성
        for label in ["Supplier", "Manufacturer", "Distributor", "Retailer", "Product"]:
            session.run(f"CREATE CONSTRAINT IF NOT EXISTS FOR (n:{label}) REQUIRE n.id IS UNIQUE")
이제 Neo4j 데이터베이스 연결 및 적재할 함수를 만들었으니, Neo4j instance에 데이터를 적재해보겠습니다.
# ===========================
# 데이터 적재 실행
# ===========================

driver = GraphDatabase.driver(uri = "bolt://...", auth = ("neo4j", "..."))

create_indexes(driver)  # 인덱스 생성
ingest_nodes(driver)    # 노드 데이터 적재
ingest_relationships(driver)  # 관계 데이터 적재

print("Data ingestion complete!")
driver.close()  # 연결 종료

=> 적재가 완료된 뒤 Neo4j 데이터베이스의 모습입니다. ("생산자와 공급자, 유통업자, 소매업자, 제품 간의 관계가 복잡하게 얽혀있는 것을 볼 수 있죠.")
이제 데이터의 적재가 성공적으로 완료되었으니, Langchain에서 제공하는 openai 임베딩 모델을 정의하고, Retrieval 단계에서 사용할 각종 Tool들도 몇 가지 정의해보겠습니다.
# ===========================
# LangChain 및 OpenAI 통합
# ===========================

import os

# OpenAI API 키 설정
os.environ["OPENAI_API_KEY"] = "sk-..."

# 임베딩 모델 및 Neo4j 벡터 저장소 설정
from langchain_openai import OpenAIEmbeddings
from langchain_community.vectorstores import Neo4jVector

# OpenAI 임베딩 모델 초기화
embedding = OpenAIEmbeddings(model="text-embedding-3-small")

# Neo4j에 임베딩된 스키마 구조 생성

# Supplier 노드에 대한 벡터 저장소 설정
neo4j_vector = Neo4jVector.from_existing_graph(
    url = "bolt://...",
    username = "neo4j",
    password = "...",

    embedding=embedding,
    index_name="supply_chain",  # 인덱스 이름
    node_label="Supplier",  # 임베딩 저장소를 Supplier 노드에 제한
    text_node_properties=["description"],  # 텍스트 임베딩할 속성
    embedding_node_property="embedding",  # 임베딩 저장할 속성명
)
# ===========================
# 구조화된 Query 처리를 위한 도구(Tool) 정의
# ===========================

from pydantic import BaseModel, Field
from typing import Optional, Dict, List

# 공급업체 카운팅을 위한 입력 스키마 정의
class SupplierCountInput(BaseModel):
    min_supply_amount: Optional[int] = Field(
        description="Minimum supply amount of the suppliers"  # Supplier의 최소 공급량
    )
    max_supply_amount: Optional[int] = Field(
        description="Maximum supply amount of the suppliers"  # Supplier의 최대 공급량
    )
    grouping_key: Optional[str] = Field(
        description="The key to group by the aggregation",    # 최종 집계를 위한 키
        enum=["supply_capacity", "location"]  # 가능한 그룹화 키 목록
    )

# 파라미터 이름 추출 유틸리티 함수
import re
from langchain_core.tools import tool

def extract_param_name(filter: str) -> str:
    """
    필터 문자열에서 파라미터 이름($로 시작하는)을 추출합니다.

    Args:
        filter: Cypher 쿼리의 필터 조건 문자열

    Returns:
        추출된 파라미터 이름($ 제외), 없으면 None
    """
    pattern = r'\$\w+'
    match = re.search(pattern, filter)  # filter 문자열에서 패턴을 검색
    if match:
        return match.group()[1:]  # $ 제외하고 반환
    return None
# ===========================
# 공급업체 수 계산 도구(Tool)
# ===========================
@tool("supplier-count", args_schema=SupplierCountInput)  # LangChain 도구로 등록
def supplier_count(
    min_supply_amount: Optional[int],  # 최소 공급량 필터
    max_supply_amount: Optional[int],  # 최대 공급량 필터
    grouping_key: Optional[str],  # 그룹화 키
) -> List[Dict]:  # 반환값: 공급업체 집계 리스트

    """Calculate the count of Suppliers based on particular filters"""
    # 필터 조건 정의
    filters = [
        ("t.supply_capacity >= $min_supply_amount", min_supply_amount),  # 최소 공급량 조건
        ("t.supply_capacity <= $max_supply_amount", max_supply_amount)   # 최대 공급량 조건
    ]

    # 파라미터 값이 있는 필터만 파라미터 딕셔너리 생성
    params = {
        extract_param_name(condition): value
        for condition, value in filters if value is not None
    }

    # 값이 있는 조건만 AND로 연결하여 WHERE 절 생성
    where_clause = " AND ".join(
        [condition for condition, value in filters if value is not None]
    )

    # 기본 Cypher 쿼리 생성
    cypher_statement = "MATCH (t:Supplier) "  # Supplier 노드 매칭
    if where_clause:
        cypher_statement += f"WHERE {where_clause} "

    # 그룹화 키가 있으면 그룹화하여 반환, 없으면 단순 카운트
    return_clause = (
        f"t.{grouping_key}, count(t) AS supplier_count"
        if grouping_key
        else "count(t) AS supplier_count"
    )
    cypher_statement += f"RETURN {return_clause}"

    print(cypher_statement)  # 디버깅용 출력
    # 쿼리 실행 및 결과 반환
    return graph.query(cypher_statement, params=params)
# ===========================
# 공급업체 목록 조회 도구(Tool)
# ===========================

# 공급업체 목록 조회를 위한 입력 스키마 정의
class SupplierListInput(BaseModel):
    sort_by: str = Field(
        description="How to sort Suppliers by supply capacity",
        enum=['supply_capacity']  # 정렬 기준 옵션
    )
    k: Optional[int] = Field(
        description="Number of Suppliers to return"  # 반환할 공급업체 수
    )
    description: Optional[str] = Field(
        description="Description of the Suppliers"  # 공급업체 설명(벡터 검색용)
    )
    min_supply_amount: Optional[int] = Field(
        description="Minimum supply amount of the suppliers"  # 최소 공급량
    )
    max_supply_amount: Optional[int] = Field(
        description="Maximum supply amount of the suppliers"  # 최대 공급량
    )

@tool("supplier-list", args_schema=SupplierListInput)  # LangChain 도구로 등록
def supplier_list(
    sort_by: str = "supply_capacity",  # 기본 정렬 기준: 공급 능력
    k : int = 4,  # 기본 반환 개수: 4
    description: Optional[str] = None,  # 설명 문자열(벡터 검색용)
    min_supply_amount: Optional[int] = None,  # 최소 공급량
    max_supply_amount: Optional[int] = None,  # 최대 공급량
) -> List[Dict]:
    """List suppliers based on particular filters"""

    # 벡터 검색만 필요한 경우(설명만 있고 다른 필터가 없는 경우)
    if description and not min_supply_amount and not max_supply_amount:
        return neo4j_vector.similarity_search(description, k=k)

    # 필터 조건 정의
    filters = [
        ("t.supply_capacity >= $min_supply_amount", min_supply_amount),
        ("t.supply_capacity <= $max_supply_amount", max_supply_amount)
    ]

    # 파라미터 딕셔너리 생성
    params = {
        key.split("$")[1]: value for key, value in filters if value is not None
    }

    # WHERE 절 생성
    where_clause = " AND ".join([condition for condition, value in filters if value is not None])
    cypher_statement = "MATCH (t:Supplier) "
    if where_clause:
        cypher_statement += f"WHERE {where_clause} "

    # 정렬 및 반환 속성 정의
    cypher_statement += " RETURN t.name AS name, t.location AS location, t.description as description, t.supply_capacity AS supply_capacity ORDER BY "

    # 정렬 기준 설정
    if description:
        # 설명이 있으면 벡터 유사도로 정렬(코사인 유사도)
        cypher_statement += "vector.similarity.cosine(t.embedding, $embedding) DESC "
        params["embedding"] = embedding.embed_query(description)  # 쿼리 문자열 임베딩
    elif sort_by == "supply_capacity":
        # 공급 능력으로 정렬
        cypher_statement += "t.supply_capacity DESC "
    else:
        # 기본 정렬 방식
        cypher_statement += "t.year DESC "

    # 결과 개수 제한
    cypher_statement += " LIMIT toInteger($limit)"
    params["limit"] = k or 4

    print(cypher_statement)  # 디버깅용 출력
    # 쿼리 실행 및 결과 반환
    data = graph.query(cypher_statement, params=params)
    return data
위 전체 코드를 각각의 셀에서 실행할 수도 있으나, main 함수를 통해 전체 구조를 한 번 실행해보죠.
def main():
    """
    공급망 관리 그래프 데이터베이스 구축 및 쿼리 실행을 위한 예제 실행용 메인 함수입니다.

    이 함수는 다음 단계를 수행합니다:

    1. Neo4j 데이터베이스 연결 설정
    2. 데이터 적재 (노드와 관계)
    3. 임베딩 모델 설정
    4. 예제 쿼리 실행

    """
    import os
    from neo4j import GraphDatabase
    from langchain_community.graphs import Neo4jGraph
    from langchain_openai import OpenAIEmbeddings
    from langchain_community.vectorstores import Neo4jVector

    print("===== 공급망 관리 그래프 데이터베이스 구축 시작 =====")

    # 환경 변수 설정
    NEO4J_URI = "bolt://..."  # Neo4j 데이터베이스 URI
    NEO4J_USER = "neo4j"      # Neo4j 사용자 이름
    NEO4J_PASSWORD = "..."    # Neo4j 비밀번호
    OPENAI_API_KEY = "sk-..." # OpenAI API 키

    # 환경 변수 설정
    os.environ["OPENAI_API_KEY"] = OPENAI_API_KEY

    # Neo4j 드라이버 연결
    driver = GraphDatabase.driver(uri=NEO4J_URI, auth=(NEO4J_USER, NEO4J_PASSWORD))

    try:
        # 1. 데이터베이스 초기화
        print("\n----- 데이터베이스 초기화 중 -----")
        # 기존 데이터 삭제 (선택 사항)
        with driver.session() as session:
            session.run("MATCH (n) DETACH DELETE n")
            print("기존 데이터 삭제 완료")

        # 2. 인덱스 생성
        print("\n----- 인덱스 생성 중 -----")
        create_indexes(driver)
        print("인덱스 생성 완료")

        # 3. 노드 데이터 적재
        print("\n----- 노드 데이터 적재 중 -----")
        ingest_nodes(driver)
        print("노드 데이터 적재 완료")

        # 4. 관계 데이터 적재
        print("\n----- 관계 데이터 적재 중 -----")
        ingest_relationships(driver)
        print("관계 데이터 적재 완료")

        # 5. LangChain Neo4jGraph 설정
        print("\n----- LangChain 그래프 설정 중 -----")
        graph = Neo4jGraph(
            url=NEO4J_URI,
            username=NEO4J_USER,
            password=NEO4J_PASSWORD,
            refresh_schema=True
        )

        # 6. 임베딩 모델 설정
        print("\n----- 임베딩 모델 설정 중 -----")
        embedding = OpenAIEmbeddings(model="text-embedding-3-small")

        # 7. Neo4j 벡터 저장소 설정
        print("\n----- 벡터 저장소 설정 중 -----")
        neo4j_vector = Neo4jVector.from_existing_graph(
            url=NEO4J_URI,
            username=NEO4J_USER,
            password=NEO4J_PASSWORD,
            embedding=embedding,
            index_name="supply_chain",
            node_label="Supplier",
            text_node_properties=["description"],
            embedding_node_property="embedding",
        )
        print("벡터 저장소 설정 완료")

        # 8. 예제 쿼리 실행
        print("\n===== 예제 쿼리 실행 =====")

        # 예제 1: 공급업체 수 계산
        print("\n----- 예제 1: 공급업체 수 계산 -----")
        result1 = supplier_count(
            min_supply_amount=20000,
            max_supply_amount=40000,
            grouping_key="location"
        )
        print("공급 능력이 20,000~40,000인 공급업체 (위치별):")
        for item in result1:
            print(f"위치: {item.get('t.location', '정보 없음')}, 업체 수: {item.get('supplier_count', 0)}")

        # 예제 2: 공급업체 목록 조회 (공급 능력 기준)
        print("\n----- 예제 2: 상위 공급업체 목록 -----")
        result2 = supplier_list(
            sort_by="supply_capacity",
            k=5,
            min_supply_amount=30000
        )
        print("공급 능력이 30,000 이상인 상위 5개 공급업체:")
        for idx, item in enumerate(result2, 1):
            print(f"{idx}. {item.get('name', '이름 없음')} - 위치: {item.get('location', '정보 없음')}, "
                  f"공급 능력: {item.get('supply_capacity', 0)}")

        # 예제 3: 설명 기반 벡터 검색
        print("\n----- 예제 3: 설명 기반 벡터 검색 -----")
        result3 = supplier_list(
            description="전자제품 부품을 공급하는 업체",
            k=3
        )
        print("'전자제품 부품'과 관련된 상위 3개 공급업체:")
        for idx, item in enumerate(result3, 1):
            print(f"{idx}. {item.get('name', '이름 없음')} - {item.get('description', '설명 없음')[:50]}...")

        print("\n===== 모든 작업이 성공적으로 완료되었습니다 =====")

    except Exception as e:
        print(f"오류 발생: {str(e)}")
    finally:
        # 드라이버 연결 종료
        driver.close()
        print("Neo4j 연결이 종료되었습니다.")

# 프로그램 시작점
if __name__ == "__main__":
    main()
3️⃣ 글을 마치면서..
이번 2주차에는 RAG에 대한 주요 개념과 Graph를 활용한 RAG 기법의 핵심 기능 확장, 그리고 LangGraph를 활용한 파이프라인 구현에 대해 살펴보았습니다.
아직 프로젝트의 방향성을 완전히 확립하지는 못했지만, 프레임워크와 툴, 핵심 로직 구현을 위한 학습을 계속 진행하고 있습니다. 앞으로도 지식 그래프와 LLM을 활용한 시스템 구축에 관한 지식을 꾸준히 공유하도록 하겠습니다!! 🫡🫡
"인턴 일기는 다음화에 계속됩니다!!"
"인턴 일기 [01화]에서 이어집니다..."
LangGraph와 지식그래프
안녕하세요, jo._.on_ 의 돌아온 인턴 일기 입니다. 😆😆 오늘은 LangGraph와 지식 그래프(Knowledge Graph)의 주요 개념에 대해 소개해 드리고자 합니다. 그리고 LangGraph와 Neo4j를 결합한 GraphRAG 시스템의 end-to-end 구조도 간단한 코드 예제를 통해 공유할 예정입니다. 그럼 바로 시작해보죠!!
1️⃣ RAG(Retrieval-Augmented Generation)의 개념
RAG는 대규모 언어 모델의 활용 기법 중 하나로, Fine-Tuning과 함께 큰 주목을 받은 기술 중 하나입니다. LLM은 사전에 방대한 양의 데이터를 학습하지만, Fine-tuning을 거치더라도 기존 지식의 한계와 Hallucination 문제를 온전히 극복하지 못한다는 문제가 있죠.
이러한 한계를 극복하기 위해 등장한 RAG는 언어 모델에 '검색(Retrieval)' 기능을 결합하여 사용자의 입력(쿼리)과 관련된 정보를 DB에서 검색한 후, 이를 기반으로 답변을 생성합니다. 이 방식은 실시간 정보 검색을 통해 더 정확한 답변을 제공하며, Fine-Tuning의 단점을 효율적으로 보완합니다. 하지만 일반적인 RAG 방식 혹은 Retrieval 기능은 여전히 몇 가지 한계가 있습니다.
'문맥(Context)의 제한' :
대부분의 RAG 시스템은 검색된 문서를 단순히 프롬프트에 추가하는 방식으로 작동하지만, LLM의 컨텍스트 창은 제한되어 있어 복잡한 질문에 대해 충분한 정보를 제공하지 못할 수 있습니다.'의미적(Semantic) 연결 부족' :
벡터 기반 검색은 단순 키워드 유사성에 의존하기 때문에, 문서 간의 논리적 관계나 개념적 연결을 파악하는 데 한계가 있습니다.'구조화된(Structured) 데이터 처리의 어려움' :
기존 RAG는 텍스트 중심으로 설계되어 있어 숫자 데이터, 날짜, 관계형 정보와 같은 구조화된 데이터를 효과적으로 처리하기 어렵습니다.'다단계(Multi-process) 추론 부족' :
복잡한 질문에 답하기 위해 여러 단계의 추론이 필요한 경우, 단순 검색 기반 접근은 충분하지 않습니다.
결국 RAG 또한 이러한 한계로 인해 실제 비즈니스 환경에서는 검색 과정에서 관련 자료를 효과적으로 가져오지 못하거나, 사용자 입력에 대한 불완전한 응답을 제공하는 등의 문제가 발생합니다. 그 중에서도 문맥의 온전한 반영이 어렵고, 의미적 연결성이 부족하다는 문제는 다음 소개할 GraphRAG의 주요 등장 배경이 됩니다.
Graph + RAG의 등장 배경
일반적인 RAG 시스템은 텍스트 형태의 데이터를 chunk 단위로 분류하고, 이를 다시 벡터 임베딩 형태로 변환하여 vectorDB에 저장합니다. 그리고 필요할 때마다 (== Retrieve 요청 시) 유사성 검색을 통해 LLM에 컨텍스트를 제공합니다. 하지만 실제 비즈니스 환경에서는 텍스트와 같은 비정형 텍스트 외에도 구조화된 속성 요소들이 다수 존재합니다.
이로 인해 AI 시스템의 복잡한 chain 구조에서 단순 벡터 기반의 쿼리는 그 정확성과 효율성이 저하될 수 있는 문제가 발생합니다. 이러한 논의들이 지속되면서 기존 벡터 기반 RAG의 한계를 보완하기 위해 지식그래프 기반의 GraphRAG가 등장했습니다.
https://blog.langchain.dev/enhancing-rag-based-applications-accuracy-by-constructing-and-leveraging-knowledge-graphs/
Neo4j의 역할
지식그래프를 구축하여 지식을 검색하는 GraphRAG는 구조화된 데이터 엔티티 간의 관계를 효율적으로 관리하고 활용할 수 있습니다. 특히 Neo4j는 이러한 그래프 구조를 표현하고 저장하는데 매우 효과적이죠 😀😀
Neo4j의 주요 특징:
대규모 그래프 분석 및 데이터 시각화를 지원하는 확장성이 뛰어난 그래프 데이터베이스
Cypher 쿼리 언어, 내장된 시각화 도구 및 커뮤니티 지원
이 Neo4j 의 강력함은 뒤에서 코드를 통해 조금 더 자세히 다뤄보도록 하겠습니다.
LangGraph의 개념
LangChain이 LLM 통합과 기본적인 체인 구성에 중점을 두었다면, LangGraph는 더 복잡한 내부 워크플로우와 정교한 의사결정 프로세스를 지원합니다.
LangGraph의 주요 특징을 LangChain과의 비교를 통해서 간단하게 소개했는데요. 크게 다음 3가지 특징이 있습니다.
그래프 구조의 워크플로우
명시적인 상태 관리
다중 에이전트 시스템
이제 GraphRAG, Neo4j, LangGraph에 대한 기본적인 형태와 특징을 이해했다면, 해당 도구들로 간단한 파이프라인을 구축해보도록 하죠!!
2️⃣ GraphRAG + LangGraph + Neo4j 구현
구현에 앞서 먼저 해당 코드가 어떤 구조와 특징을 띄고 있는지 설명드리겠습니다.😴😴 이 코드는 Python을 통해 구현한 공급망 관리(Supply Chain Management) 시스템의 일부입니다. 먼저 Neo4j 를 통해 그래프 데이터베이스를 구축하고, 이를 대형 언어 모델(LLM - OpenAI API)과 연결하여 자연어로 데이터를 쿼리할 수 있는 간단한 시스템이죠. 구체적으로는:
Neo4j 그래프 데이터베이스 구축:
공급자(Supplier), 제조업체(Manufacturer), 유통업체(Distributor), 소매업체(Retailer), 제품(Product) 등의 노드 & 이들 간의 관계(supplies, manufactures, offers 등)를 CSV 파일에서 로드하여 그래프 데이터베이스에 저장
OpenAI의 임베딩 모델 통합:
텍스트 설명에 대한 벡터 임베딩을 생성하여 Neo4j에 저장 & 이를 통해 의미론적 유사성 기반의 검색 가능
LangChain 프레임워크를 활용한 도구(Tool) 생성:
supplier-count: 특정 조건(공급량 범위 등)에 맞는 공급업체 수를 계산하는 도구supplier-list: 조건에 맞는 공급업체 목록을 추출하는 도구이 도구들은 자연어 쿼리를 Cypher 쿼리로 변환하는 역할
아래 코드는 링크를 참고하여 작성했습니다. (실습 중 데이터가 필요하다면 해당 링크를 참고하세요!!)
https://medium.com/globant/langgraph-ai-agents-with-neo4j-knowledge-graph-7e688888f547
먼저 각종 라이브러리를 설치하여 초기 설정을 마칩니다.
# ===========================
# 라이브러리 설치 및 Neo4j 초기 설정
# ===========================

# !pip install langchain
# !pip install langchain_openai
# !pip install neo4j
# !pip install pyvis

# Neo4j 인스턴스 생성 및 연결 설정

from langchain_community.graphs import Neo4jGraph

graph = Neo4jGraph(url = "bolt://...", username = "neo4j", password = "...", refresh_schema = False)
이후 Neo4j 인스턴스를 생성했다면, 링크에서 제공하는 데이터를 Neo4j 인스턴스에 적재할 수 있는 노드 생성 함수와 엣지 생성 함수, 인덱스 생성 함수를 정의해보겠습니다.
nodes.csv
relationships.csv
# ===========================
# 데이터 적재(Ingestion) 준비
# ===========================

import csv
import numpy as np
from neo4j import GraphDatabase

# 노드 정보가 담긴 CSV 파일 경로 설정 (소매업자, 제품, 공급자, 유통업자, 제조업자)
NODES_CSV = "C:/LangGraph_Tutorial/.../nodes.csv"

# 엣지(관계) 정보가 담긴 CSV 파일 경로 설정 (공급, 제조, 제안 관계)
RELATIONSHIPS_CSV = "C:/LangGraph_Tutorial/.../relationships.csv"

# 노드 타입에 따른 레이블 매핑 함수
def get_label_for_type(node_type):
    """
    노드 타입에 따라 적절한 Neo4j 레이블을 반환합니다.

    Args:
        node_type: 노드의 타입 문자열

    Returns:
        해당 타입에 맞는 Neo4j 레이블, 매핑이 없을 경우 'Entity' 반환
    """
    mapping = {
        "Supplier": "Supplier", # 공급자
        "Manufacturer" : "Manufacturer", # 생산자
        "Distributor" : "Distributor", # 유통업자
        "Retailer" : "Retailer", # 소매업자
        "Product" : "Product" # 제품
    }

    return mapping.get(node_type, "Entity")
# ===========================
# 노드 데이터 적재 함수
# ===========================

def ingest_nodes(driver):
    """
    CSV 파일에서 노드 정보를 읽어 Neo4j 데이터베이스에 적재합니다.

    Args:
        driver: Neo4j 드라이버 객체
    """
    with driver.session() as session:
        with open(NODES_CSV, mode = 'r', encoding = "utf-8") as f:
            reader = csv.DictReader(f)

            for row in reader:
                # CSV에서 노드 속성 추출
                node_id = row['id:ID']
                name = row['name']
                node_type = row['type']
                location = row['location']
                supply_capacity = np.random.randint(1000, 50001)  # 공급 용량 랜덤 생성
                description = row['description']
                label = get_label_for_type(node_type)  # 노드 타입에 맞는 레이블 가져오기

                if location.strip():
                    # 위치 정보가 있는 경우 모든 속성 포함하여 노드 생성
                    query = f"""
                    MERGE (n:{label} {{id:$id}})
                    SET n.name = $name, n.location = $location,
                        n.description = $description, n.supply_capacity = $supply_capacity
                    """
                    params = {
                        "id": node_id,
                        "name" : name,
                        "location" : location,
                        "description" : description,
                        "supply_capacity" : supply_capacity
                    }

                else :
                    # 위치 정보가 없는 경우 기본 속성만 포함하여 노드 생성
                    query = f"""
                    MERGE (n:{label} {{id:$id}})
                    SET n.name = $name
                    """
                    params = {"id": node_id, "name": name}
                session.run(query, params)  # Cypher 쿼리 실행
# ===========================
# 관계(엣지) 데이터 적재 함수
# ===========================

def ingest_relationships(driver):
    """
    CSV 파일에서 관계(엣지) 정보를 읽어 Neo4j 데이터베이스에 적재합니다.
    => 이 때 Neo4j 가 지원하는 Cypher 언어를 사용합니다.

    Args:
        driver: Neo4j 드라이버 객체
    """
    with driver.session() as session:
        with open(RELATIONSHIPS_CSV, mode='r', encoding='utf-8') as f:
            reader = csv.DictReader(f)
            for row in reader:
                # CSV에서 관계 속성 추출
                start_id = row[':START_ID']  # 시작 노드 ID
                end_id = row[':END_ID']  # 종료 노드 ID
                rel_type = row[':TYPE']  # 관계 타입
                product = row['product']  # 관련 제품 정보

                if product.strip():
                    # 제품 정보가 있는 경우 속성에 포함하여 관계 생성
                    query = f"""
                    MATCH (start {{id:$start_id}})
                    MATCH (end {{id:$end_id}})
                    MERGE (start)-[r:{rel_type} {{product:$product}}]->(end)
                    """
                    params = {
                        "start_id": start_id,
                        "end_id": end_id,
                        "product": product
                    }
                else:
                    # 제품 정보가 없는 경우 기본 관계만 생성
                    query = f"""
                    MATCH (start {{id:$start_id}})
                    MATCH (end {{id:$end_id}})
                    MERGE (start)-[r:{rel_type}]->(end)
                    """
                    params = {
                        "start_id": start_id,
                        "end_id": end_id
                    }
                session.run(query, params)  # Cypher 쿼리 실행
# ===========================
# 인덱스 생성 함수
# ===========================

def create_indexes(driver):
    """
    노드 ID에 대한 유일성 제약조건(Unique Constraint)을 생성하여 검색 성능을 향상시킵니다.

    Args:
        driver: Neo4j 드라이버 객체
    """
    with driver.session() as session:
        # 각 노드 타입별로 ID에 대한 유일성 제약조건 생성
        for label in ["Supplier", "Manufacturer", "Distributor", "Retailer", "Product"]:
            session.run(f"CREATE CONSTRAINT IF NOT EXISTS FOR (n:{label}) REQUIRE n.id IS UNIQUE")
이제 Neo4j 데이터베이스 연결 및 적재할 함수를 만들었으니, Neo4j instance에 데이터를 적재해보겠습니다.
# ===========================
# 데이터 적재 실행
# ===========================

driver = GraphDatabase.driver(uri = "bolt://...", auth = ("neo4j", "..."))

create_indexes(driver)  # 인덱스 생성
ingest_nodes(driver)    # 노드 데이터 적재
ingest_relationships(driver)  # 관계 데이터 적재

print("Data ingestion complete!")
driver.close()  # 연결 종료
=> 적재가 완료된 뒤 Neo4j 데이터베이스의 모습입니다. ("생산자와 공급자, 유통업자, 소매업자, 제품 간의 관계가 복잡하게 얽혀있는 것을 볼 수 있죠.")
이제 데이터의 적재가 성공적으로 완료되었으니, Langchain에서 제공하는 openai 임베딩 모델을 정의하고, Retrieval 단계에서 사용할 각종 Tool들도 몇 가지 정의해보겠습니다.
# ===========================
# LangChain 및 OpenAI 통합
# ===========================

import os

# OpenAI API 키 설정
os.environ["OPENAI_API_KEY"] = "sk-..."

# 임베딩 모델 및 Neo4j 벡터 저장소 설정
from langchain_openai import OpenAIEmbeddings
from langchain_community.vectorstores import Neo4jVector

# OpenAI 임베딩 모델 초기화
embedding = OpenAIEmbeddings(model="text-embedding-3-small")

# Neo4j에 임베딩된 스키마 구조 생성

# Supplier 노드에 대한 벡터 저장소 설정
neo4j_vector = Neo4jVector.from_existing_graph(
    url = "bolt://...",
    username = "neo4j",
    password = "...",

    embedding=embedding,
    index_name="supply_chain",  # 인덱스 이름
    node_label="Supplier",  # 임베딩 저장소를 Supplier 노드에 제한
    text_node_properties=["description"],  # 텍스트 임베딩할 속성
    embedding_node_property="embedding",  # 임베딩 저장할 속성명
)
# ===========================
# 구조화된 Query 처리를 위한 도구(Tool) 정의
# ===========================

from pydantic import BaseModel, Field
from typing import Optional, Dict, List

# 공급업체 카운팅을 위한 입력 스키마 정의
class SupplierCountInput(BaseModel):
    min_supply_amount: Optional[int] = Field(
        description="Minimum supply amount of the suppliers"  # Supplier의 최소 공급량
    )
    max_supply_amount: Optional[int] = Field(
        description="Maximum supply amount of the suppliers"  # Supplier의 최대 공급량
    )
    grouping_key: Optional[str] = Field(
        description="The key to group by the aggregation",    # 최종 집계를 위한 키
        enum=["supply_capacity", "location"]  # 가능한 그룹화 키 목록
    )

# 파라미터 이름 추출 유틸리티 함수
import re
from langchain_core.tools import tool

def extract_param_name(filter: str) -> str:
    """
    필터 문자열에서 파라미터 이름($로 시작하는)을 추출합니다.

    Args:
        filter: Cypher 쿼리의 필터 조건 문자열

    Returns:
        추출된 파라미터 이름($ 제외), 없으면 None
    """
    pattern = r'\$\w+'
    match = re.search(pattern, filter)  # filter 문자열에서 패턴을 검색
    if match:
        return match.group()[1:]  # $ 제외하고 반환
    return None
# ===========================
# 공급업체 수 계산 도구(Tool)
# ===========================
@tool("supplier-count", args_schema=SupplierCountInput)  # LangChain 도구로 등록
def supplier_count(
    min_supply_amount: Optional[int],  # 최소 공급량 필터
    max_supply_amount: Optional[int],  # 최대 공급량 필터
    grouping_key: Optional[str],  # 그룹화 키
) -> List[Dict]:  # 반환값: 공급업체 집계 리스트

    """Calculate the count of Suppliers based on particular filters"""
    # 필터 조건 정의
    filters = [
        ("t.supply_capacity >= $min_supply_amount", min_supply_amount),  # 최소 공급량 조건
        ("t.supply_capacity <= $max_supply_amount", max_supply_amount)   # 최대 공급량 조건
    ]

    # 파라미터 값이 있는 필터만 파라미터 딕셔너리 생성
    params = {
        extract_param_name(condition): value
        for condition, value in filters if value is not None
    }

    # 값이 있는 조건만 AND로 연결하여 WHERE 절 생성
    where_clause = " AND ".join(
        [condition for condition, value in filters if value is not None]
    )

    # 기본 Cypher 쿼리 생성
    cypher_statement = "MATCH (t:Supplier) "  # Supplier 노드 매칭
    if where_clause:
        cypher_statement += f"WHERE {where_clause} "

    # 그룹화 키가 있으면 그룹화하여 반환, 없으면 단순 카운트
    return_clause = (
        f"t.{grouping_key}, count(t) AS supplier_count"
        if grouping_key
        else "count(t) AS supplier_count"
    )
    cypher_statement += f"RETURN {return_clause}"

    print(cypher_statement)  # 디버깅용 출력
    # 쿼리 실행 및 결과 반환
    return graph.query(cypher_statement, params=params)
# ===========================
# 공급업체 목록 조회 도구(Tool)
# ===========================

# 공급업체 목록 조회를 위한 입력 스키마 정의
class SupplierListInput(BaseModel):
    sort_by: str = Field(
        description="How to sort Suppliers by supply capacity",
        enum=['supply_capacity']  # 정렬 기준 옵션
    )
    k: Optional[int] = Field(
        description="Number of Suppliers to return"  # 반환할 공급업체 수
    )
    description: Optional[str] = Field(
        description="Description of the Suppliers"  # 공급업체 설명(벡터 검색용)
    )
    min_supply_amount: Optional[int] = Field(
        description="Minimum supply amount of the suppliers"  # 최소 공급량
    )
    max_supply_amount: Optional[int] = Field(
        description="Maximum supply amount of the suppliers"  # 최대 공급량
    )

@tool("supplier-list", args_schema=SupplierListInput)  # LangChain 도구로 등록
def supplier_list(
    sort_by: str = "supply_capacity",  # 기본 정렬 기준: 공급 능력
    k : int = 4,  # 기본 반환 개수: 4
    description: Optional[str] = None,  # 설명 문자열(벡터 검색용)
    min_supply_amount: Optional[int] = None,  # 최소 공급량
    max_supply_amount: Optional[int] = None,  # 최대 공급량
) -> List[Dict]:
    """List suppliers based on particular filters"""

    # 벡터 검색만 필요한 경우(설명만 있고 다른 필터가 없는 경우)
    if description and not min_supply_amount and not max_supply_amount:
        return neo4j_vector.similarity_search(description, k=k)

    # 필터 조건 정의
    filters = [
        ("t.supply_capacity >= $min_supply_amount", min_supply_amount),
        ("t.supply_capacity <= $max_supply_amount", max_supply_amount)
    ]

    # 파라미터 딕셔너리 생성
    params = {
        key.split("$")[1]: value for key, value in filters if value is not None
    }

    # WHERE 절 생성
    where_clause = " AND ".join([condition for condition, value in filters if value is not None])
    cypher_statement = "MATCH (t:Supplier) "
    if where_clause:
        cypher_statement += f"WHERE {where_clause} "

    # 정렬 및 반환 속성 정의
    cypher_statement += " RETURN t.name AS name, t.location AS location, t.description as description, t.supply_capacity AS supply_capacity ORDER BY "

    # 정렬 기준 설정
    if description:
        # 설명이 있으면 벡터 유사도로 정렬(코사인 유사도)
        cypher_statement += "vector.similarity.cosine(t.embedding, $embedding) DESC "
        params["embedding"] = embedding.embed_query(description)  # 쿼리 문자열 임베딩
    elif sort_by == "supply_capacity":
        # 공급 능력으로 정렬
        cypher_statement += "t.supply_capacity DESC "
    else:
        # 기본 정렬 방식
        cypher_statement += "t.year DESC "

    # 결과 개수 제한
    cypher_statement += " LIMIT toInteger($limit)"
    params["limit"] = k or 4

    print(cypher_statement)  # 디버깅용 출력
    # 쿼리 실행 및 결과 반환
    data = graph.query(cypher_statement, params=params)
    return data
위 전체 코드를 각각의 셀에서 실행할 수도 있으나, main 함수를 통해 전체 구조를 한 번 실행해보죠.
def main():
    """
    공급망 관리 그래프 데이터베이스 구축 및 쿼리 실행을 위한 예제 실행용 메인 함수입니다.

    이 함수는 다음 단계를 수행합니다:

    1. Neo4j 데이터베이스 연결 설정
    2. 데이터 적재 (노드와 관계)
    3. 임베딩 모델 설정
    4. 예제 쿼리 실행

    """
    import os
    from neo4j import GraphDatabase
    from langchain_community.graphs import Neo4jGraph
    from langchain_openai import OpenAIEmbeddings
    from langchain_community.vectorstores import Neo4jVector

    print("===== 공급망 관리 그래프 데이터베이스 구축 시작 =====")

    # 환경 변수 설정
    NEO4J_URI = "bolt://..."  # Neo4j 데이터베이스 URI
    NEO4J_USER = "neo4j"      # Neo4j 사용자 이름
    NEO4J_PASSWORD = "..."    # Neo4j 비밀번호
    OPENAI_API_KEY = "sk-..." # OpenAI API 키

    # 환경 변수 설정
    os.environ["OPENAI_API_KEY"] = OPENAI_API_KEY

    # Neo4j 드라이버 연결
    driver = GraphDatabase.driver(uri=NEO4J_URI, auth=(NEO4J_USER, NEO4J_PASSWORD))

    try:
        # 1. 데이터베이스 초기화
        print("\n----- 데이터베이스 초기화 중 -----")
        # 기존 데이터 삭제 (선택 사항)
        with driver.session() as session:
            session.run("MATCH (n) DETACH DELETE n")
            print("기존 데이터 삭제 완료")

        # 2. 인덱스 생성
        print("\n----- 인덱스 생성 중 -----")
        create_indexes(driver)
        print("인덱스 생성 완료")

        # 3. 노드 데이터 적재
        print("\n----- 노드 데이터 적재 중 -----")
        ingest_nodes(driver)
        print("노드 데이터 적재 완료")

        # 4. 관계 데이터 적재
        print("\n----- 관계 데이터 적재 중 -----")
        ingest_relationships(driver)
        print("관계 데이터 적재 완료")

        # 5. LangChain Neo4jGraph 설정
        print("\n----- LangChain 그래프 설정 중 -----")
        graph = Neo4jGraph(
            url=NEO4J_URI,
            username=NEO4J_USER,
            password=NEO4J_PASSWORD,
            refresh_schema=True
        )

        # 6. 임베딩 모델 설정
        print("\n----- 임베딩 모델 설정 중 -----")
        embedding = OpenAIEmbeddings(model="text-embedding-3-small")

        # 7. Neo4j 벡터 저장소 설정
        print("\n----- 벡터 저장소 설정 중 -----")
        neo4j_vector = Neo4jVector.from_existing_graph(
            url=NEO4J_URI,
            username=NEO4J_USER,
            password=NEO4J_PASSWORD,
            embedding=embedding,
            index_name="supply_chain",
            node_label="Supplier",
            text_node_properties=["description"],
            embedding_node_property="embedding",
        )
        print("벡터 저장소 설정 완료")

        # 8. 예제 쿼리 실행
        print("\n===== 예제 쿼리 실행 =====")

        # 예제 1: 공급업체 수 계산
        print("\n----- 예제 1: 공급업체 수 계산 -----")
        result1 = supplier_count(
            min_supply_amount=20000,
            max_supply_amount=40000,
            grouping_key="location"
        )
        print("공급 능력이 20,000~40,000인 공급업체 (위치별):")
        for item in result1:
            print(f"위치: {item.get('t.location', '정보 없음')}, 업체 수: {item.get('supplier_count', 0)}")

        # 예제 2: 공급업체 목록 조회 (공급 능력 기준)
        print("\n----- 예제 2: 상위 공급업체 목록 -----")
        result2 = supplier_list(
            sort_by="supply_capacity",
            k=5,
            min_supply_amount=30000
        )
        print("공급 능력이 30,000 이상인 상위 5개 공급업체:")
        for idx, item in enumerate(result2, 1):
            print(f"{idx}. {item.get('name', '이름 없음')} - 위치: {item.get('location', '정보 없음')}, "
                  f"공급 능력: {item.get('supply_capacity', 0)}")

        # 예제 3: 설명 기반 벡터 검색
        print("\n----- 예제 3: 설명 기반 벡터 검색 -----")
        result3 = supplier_list(
            description="전자제품 부품을 공급하는 업체",
            k=3
        )
        print("'전자제품 부품'과 관련된 상위 3개 공급업체:")
        for idx, item in enumerate(result3, 1):
            print(f"{idx}. {item.get('name', '이름 없음')} - {item.get('description', '설명 없음')[:50]}...")

        print("\n===== 모든 작업이 성공적으로 완료되었습니다 =====")

    except Exception as e:
        print(f"오류 발생: {str(e)}")
    finally:
        # 드라이버 연결 종료
        driver.close()
        print("Neo4j 연결이 종료되었습니다.")

# 프로그램 시작점
if __name__ == "__main__":
    main()
3️⃣ 글을 마치면서..
이번 2주차에는 RAG에 대한 주요 개념과 Graph를 활용한 RAG 기법의 핵심 기능 확장, 그리고 LangGraph를 활용한 파이프라인 구현에 대해 살펴보았습니다.
아직 프로젝트의 방향성을 완전히 확립하지는 못했지만, 프레임워크와 툴, 핵심 로직 구현을 위한 학습을 계속 진행하고 있습니다. 앞으로도 지식 그래프와 LLM을 활용한 시스템 구축에 관한 지식을 꾸준히 공유하도록 하겠습니다!! 🫡🫡
"인턴 일기는 다음화에 계속됩니다!!"
